Upgrading Powertech Multi-Factor Authentication
These instructions guide you through the process of upgrading Powertech Multi-Factor Authentication.
Upgrade Procedure Overview
Like installation, the Powertech Multi-Factor Authentication upgrade procedure on your network is a multi-step process. Perform the upgrade in the order listed below.
- HelpSystems Insite. This is the same as the installation process. See HelpSystems Insite Documentation List for instructions that describe how to install and use HelpSystems Insite. The latest version of HelpSystems Insite is required for compatibility with the latest Authentication Manager.
- Powertech Multi-Factor Authentication Authentication Manager and Data Services. The Authentication Manager must be stopped on the Primary and Secondary systems prior to installing the upgrade. See Upgrading the Authentication Manager and Data Services.
- Powertech Multi-Factor Authentication IBM i agent. The latest IBM i agent software must be installed on all systems to be secured by Powertech Multi-Factor Authentication to ensure compatibility. See Installing the IBM i Agent.
Upgrading the Authentication Manager and Data Services
The following instructions demonstrate how to upgrade the Authentication Manager and Data Services on a Primary and Secondary system in order to provide replication and failover capability. If you intend to upgrade on a single system only, use the initial steps of the following procedure for your platform (stopping when directed to repeat steps for a Secondary system).
As of Powertech MFA 1.5, the process used to support failover has changed. See Installing the Authentication Manager and Data Services with Failover Suppoprt for details.
To upgrade the Powertech Multi-Factor Authentication Authentication Manager and Data Services on Linux
- Login as root on the server you want to use as your Primary installation. The installer must be run as root or with sudo.
- Download the Powertech Multi-Factor Authentication for Linux file (installPowertechMFA.tgz) to a temporary directory on the system. To acquire the file, go to the HelpSystems website and click My Account. (The "Trial" download is the full product, which can be unlocked with a valid License Key.)
- Use the following command to extract the contents of the file:
tar xvzf installPowertechMFA.tgz
Files are extracted to the directory installPowertechMFA.
- Use the following commands to stop the Authentication Manager service:
- If your Linux system supports systemctl, use:
systemctl stop HelpSystemsAccessAuthenticatorManager.service
- If your Linux system does not support systemctl, use:
- Use the following commands to start the installer:
cd installPowertechMFA
./serverInstall
-
When prompted to choose whether you want to use the default ports, either indicate y accept and proceed, or n to change the ports used.
NOTE: In order to use Powertech MFA, your firewall must allow communication over the ports configured here. -
When prompted to provide the ActiveMQ IP address list, enter the IP addresses of the servers being used for this implementation, separated by semicolons (;). The order of the IP addresses entered here must be the same for each Powertech MFA Authentication Manager installation included in this deployment.
EXAMPLE:

- When prompted to verify the server IP, confirm it is correct. Or, if it is not correct, enter n, then enter the correct IP.
- Powertech Multi-Factor Authentication creates the Primary database and starts the product. It installs to /opt/helpsystems/PowertechMFA.
- Open HelpSystems Insite and open the Powertech MFA module.
- In the Navigation Pane, click Managers.
- Click Add. The New Manager screen appears. Enter the IP Address of the first server in this deployment, enter the license key, and click Save. Repeat this step for the additional servers in this deployment.
-
In the Navigation pane, choose Server Health and Failover. All servers configured should appear in this table. The Primary server's name is listed in blue. For a full description, see Server Health and Failover screen. A
 in the Authentication Manager and Database Service columns indicate the services are active and ready for you to proceed with the remaining secondary installations.
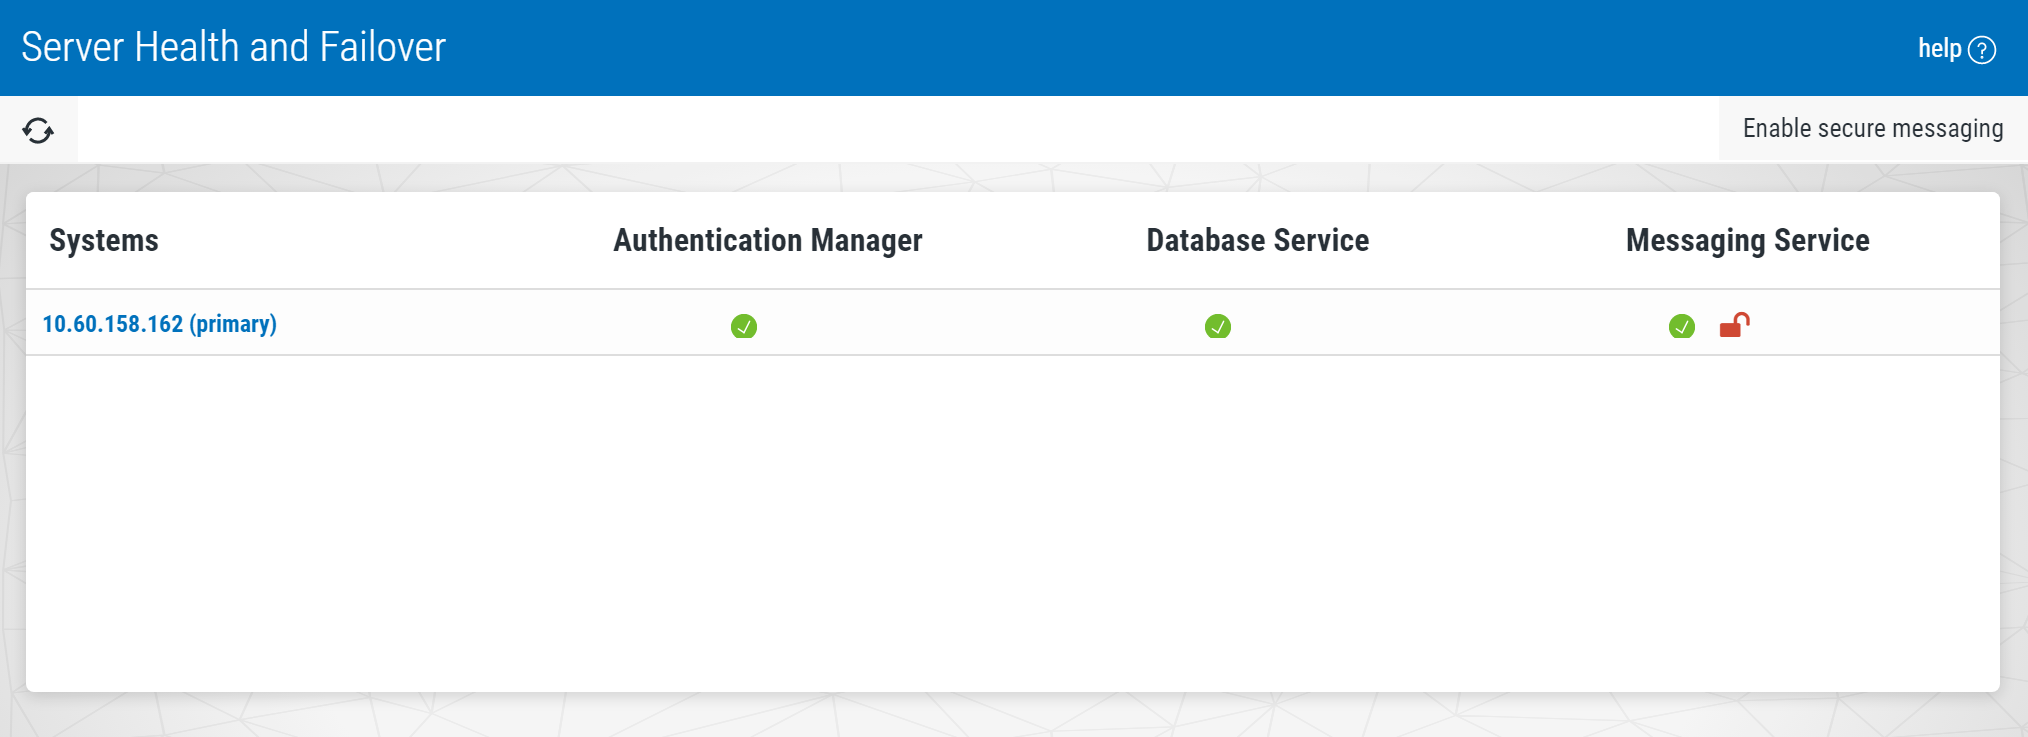
As mentioned previously, the application layer handles governance of the leader. The terms leader and master are basically synonymous. Leader pertains to the application layer, which determines the database master. The leader and master are synchronized with one another. If the leader changes, as does the master database, and vice versa. In our recommended three-system deployment, when system 1 fails for any reason, system 2 becomes the leader, and the database is promoted to the master. All other instances are designated secondary and stream from the new master (system 2). To initiate failover manually, see Manual Failover.
-
After you have confirmed the Primary server's Authentication Manager and Database Service are active, repeat steps 2-8 for all additional servers included in this deployment. Be sure the ports and Server List entry is identical for each installation.
To secure the messaging service, see Enabling Secure Messaging.
/etc/init.d/HelpSystemsAccessAuthenticatorManager.sh stop
To upgrade the Powertech Multi-Factor Authentication Authentication Manager and Data Services on Windows
- Login to the Windows server of your Primary installation.
- Download the Powertech Multi-Factor Authentication installer (setupPowertechMFA.exe). To do so, go to the HelpSystems website and click My Account. (The "Trial" download is the full product, which can be unlocked with a valid License Key.)
- Stop the Authentication Manager service. To do so:
- In the search bar type "services.msc" and press Enter. Or, click the Start menu and choose Run, then type "services.msc".
- Right-click HelpSystems Powertech Multi-Factor Authentication Manager and choose Stop.
- Close the Services window.
- Double-click the installer file to begin the installation process.WARNING: If you need to terminate the installation process before finishing, delete the C:\Program Files\Help Systems\Powertech MFA folder and start the installer again.
- Follow the instructions to continue the installation.
- When the HelpSystems Access Manager and Data Services Configuration Manager appears, configure ports for the manager and services.
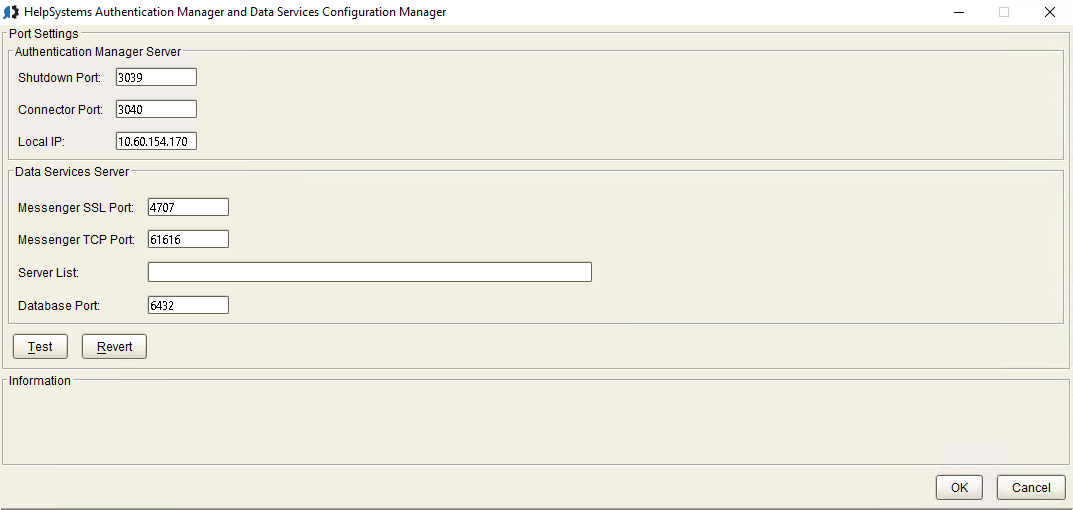 NOTE: In order to use Powertech MFA, your firewall must allow communication over the ports configured here.
The installer informs you if the default ports are available. If a port is not available, enter a new port number and click Test to see if it is available.
- For Server List, enter the IP addresses of the servers being used for this implementation, separated by semicolons (;). The order of the IP addresses entered here must be the same for each Powertech MFA Authentication Manager installation included in this deployment.
- Click OK to save the ports and continue installation. See also Port Descriptions.
- Click Finish to complete installation on the Primary server.
- Open HelpSystems Insite and open the Powertech MFA module.
- In the Navigation Pane, click Managers.
- Click Add. The New Manager screen appears. Enter the IP Address of the first server in this deployment, enter the license key, and click Save. Repeat this step for the additional servers in this deployment.
-
In the Navigation pane, choose Server Health and Failover. The server you have just configured should appear in this table, and be marked "primary." For a full description, see Server Health and Failover screen. A
in the Authentication Manager and Database Service columns indicate the services are active and ready for you to proceed with the remaining secondary installations.
As mentioned previously, the application layer handles governance of the leader. The terms leader and master are basically synonymous. Leader pertains to the application layer, which determines the database master. The leader and master are synchronized with one another. If the leader changes, as does the master database, and vice versa. In our recommended three-system deployment, when system 1 fails for any reason, system 2 becomes the leader, and the database is promoted to the master. All other instances are designated secondary and stream from the new master (system 2). To initiate failover manually, see Manual Failover.
-
After you have confirmed the Primary server's Authentication Manager and Database Service are active, repeat steps 2-7 for all additional servers included in this deployment. Be sure the ports and Server List entry is identical for each installation.
To secure the messaging service, see Enabling Secure Messaging.