Installation
The following are general system requirements and may vary depending on the nature of your environment.
Minimum System Requirements
Linux
- AWS2
- CentOS 7.x Intel 64-bit
- Mint 18
- Oracle 7.x Intel 64-bit
- RHEL 7.x Intel 64-bit
- RHEL 7.2 Power Linux Big Endian
- RHEL 7.1 Power Linux Little Endian (and later)
- SLES 12 & 15 Intel 64-bit
- SLES 12 Power Linux Little Endian
- Ubuntu 16.04 Intel 64-bit
- Approximately 300MB disk space
AIX
- IBM AIX 7.1 TL4
- IBM AIX 7.2 TL0
- Approximately 300MB disk space
Compatibility with HelpSystems Insite
To use HelpSystems Insite to access your products through a web browser, you must meet the following browser and/or operating system requirements.
| Hardware Type | Minimum Browser and/or OS Requirements |
|---|---|
| Desktop/Laptop | Firefox 11 or higher Chrome 21 or higher Internet Explorer 11 Safari 6.1 or higher Microsoft Edge |
| Mobile Device | iOS: Browsers on iOS 8 or higher Android: OS 4.4 or higher using Chrome Windows: OS 10 using Edge |
| IBM i | V7R1 or higher operating system |
For more details, see Insite System Requirements.
Installing or updating
- Download the Powertech Antivirus install file for your operating system from the HelpSystems Community Portal. If you're a new user, you should have received an email message containing the download link. If you don't have it, contact your Regional Manager.
NOTE: AIX users: Powertech Antivirus can be installed using the
rpmcommand or using SMIT (System Management Interface Tool). Using either method, first change to the directory where the file is located (i.e. cd /home). - Unzip the download file, then place the rpm file, or deb file for Ubuntu, on the host machine.
If you are updating Powertech Antivirus, you will run the product installer over the existing installation. By default, the update folder is the same as the one used for your original Powertech Antivirus installation. (If your current installation uses a different install path, that path can be provided with the --prefix option.) Before updating, backup any user data.
Once the update is complete, a new license file will need to be placed in the installation folder. The existing license.xml file should be removed. Make sure to keep a copy of license.xml if a rollback to the previous version is needed.
NOTE: If you are updating and need to identify the version that is currently installed, run the following command: /opt/sgav/avsvcinfo
Installing or Updating with RPM
Use the following instructions to install or update Powertech Antivirus with RPM.
To install or update on Red Hat, SLES, or AIX with RPM
Run the following command to install:
rpm --install <rpm-file-name>
where <rpm-file-name> is the name of the .rpm installation file.
By default, the product will install to the /opt/sgav directory which will be created if it does not exist. To install to a different directory, use the --prefix option. For example:
rpm --install <rpm-file-name> --prefix /home/sgav
will install to the /home/sgav directory.
Run the following command to update:
rpm --upgrade <rpm-file-name>
where <rpm-file-name> is the name of the latest version of the .rpm installation file.
If you have installed to an alternate prefix, you must specify the prefix when upgrading if you want the new version installed there as well:
rpm --upgrade <rpm-file-name> --prefix /home/sgav
To install or update on Ubuntu with DEB
To install on Ubuntu, run the following command:
dpkg -i <file-name>
where <file-name> is the name of the product .deb file.
To uninstall on Red Hat and SLES, run the following command:
rpm -e sgav
To uninstall on Ubuntu, run the following command:
dpkg -r sgav
AIX Only: Installing or Updating using SMIT (System Management Interface Tool)
To install or update using SMIT, run the following command:
smit install_software
Type the directory where the .rpm file is stored in the INPUT device field, and type sgav for SOFTWARE to install as shown below:
			SOFTWARE to install

Move cursor to desired item and press F7. Use arrow keys to scroll.
    ONE OR MORE items can be selected.
Press Enter AFTER making all selections.

   sgav                                                   ALL

      @@R:sgav-5.0.0-705 5.0.0-705
      @@R:sgav-4.3.0-602 4.3.0-602
Install Software
- Type or select values in entry fields.
- Press Enter AFTER making all desired changes.
[Entry Fields]
* INPUT device / directory for software               /home
* SOFTWARE to install                                [sgav-5.0.0-705 sgav-5.0.0-705  > +
PREVIEW only? (install operation will NOT occur)    no                     +
COMMIT software updates?                            yes                    +
SAVE replaced files?                                no                     +
AUTOMATICALLY install requisite software?           yes                    +
EXTEND file systems if space needed?                yes                    +
OVERWRITE same or newer versions?                   no                     +
VERIFY install and check file sizes?                no                     +
Include corresponding LANGUAGE filesets?            yes                    +
DETAILED output?                                    no                     +
Process multiple volumes?                           yes                    +
ACCEPT new license agreements?                      no                     +
Preview new LICENSE agreements?                     no                     +
WPAR Management
Perform Operation in Global Environment         yes                    +
Perform Operation on Detached WPARs             no                     +
Detached WPAR Names                        [_all_wpars]            +
Remount Installation Device in WPARs            yes                    +
Alternate WPAR Installation Device             []
F1=Help          F2=Refresh        F3=Cancel        F4=List
F5=Reset         F6=Command        F7=Edit          F8=Image
F9=Shell         F10=Exit          Enter=Do
- When the installation is complete, the following screen will appear. Ensure the Command status is
OK.
COMMAND STATUS
Command: OK            stdout: yes           stderr: no
Before command completion, additional instructions may appear below.
installp: The specified device /home/root
is not a valid device or file.
geninstall -I "a -cgNQqwX -J"  -Z   -d /home -f File 2>&1

File:
R:sgav-5.0.0-705
Validating RPM package selections ...
Please wait...
sgav                        ##################################################
Licensing
After your purchase, you will receive an email from HelpSystems with your license code attached. To license the software:
- Save the attached file to the /opt/sgav directory (or wherever the product was installed).
- Rename the file to "license".
Connecting Powertech Antivirus to HelpSystems Insite
In order to use HelpSystems Insite to monitor and manage endpoints, you need to register Powertech Antivirus on the endpoint using the Insite Integration Service. To do so:
- Install HelpSystems Insite, including the Powertech Antivirus module (an option within the Insite installation wizard). The Insite download is available at the HelpSystems Community Portal. You can reference instructions for installing, licensing, and configuring Insite on the Insite download page.
- Open Insite in your web browser.
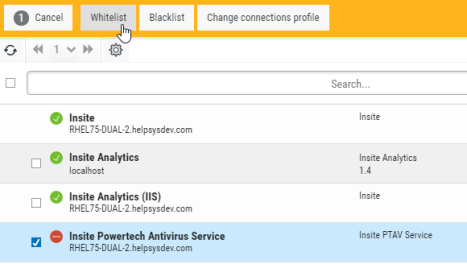
- Whitelist the Insite Powertech Antivirus service.
- Go to Settings > Products and check Insite Powertech Antivirus Service.
- Click Whitelist.
- Copy your Insite Service API Key. To do so:
- Go to Settings > Integration Service Admin.
- For the key, choose
 (Show Actions) > Copy.
- On the endpoint:
- Go to the Integration Service folder using command cd /opt/sgav/integration
- Run the registration command register.sh with the required parameters, pasting the Server Key you have copied for -k.
Required Parameters:
-k|--key)       Server Key
-s|--server)    Fully Qualified Domain Name
Optional Parameters:
-p|--port)      Server Port [default=8998]
-a|--alias)     Alias Name
-c|--client)    Client IP/DNS Name
-f|--folder)    Client Install Path
EXAMPLE:./register.sh -k ad24embc-517u-43f1-80a8-68446a2f0e8d -s myinsiteserver.mydomain.com
- Return to Insite and choose Powertech Antivirus > Connection Settings. The server you have added appears in the list. Its status is New
 , indicating the endpoint has not been Whitelisted. Whitelisting an endpoint is required to indicate the endpoint should be allowed to communicate with the Insite server.
 - To approve the registered endpoint, click (Show Actions) > Whitelist. Doing this:
- Allows the Powertech Antivirus Service to connect to Insite's Integration Service.
- Triggers the Integration Service to start sending health check requests to the endpoint system.
NOTE: Servers can also be whitelisted by checking the server and selecting Whitelist at the top of the screen. - Run the following command on the endpoint system (in ptav-home/integration) to begin responding to health check requests sent by Insite.
- Repeat steps 2-6 for additional servers you would like to register and scan. See Using Powertech Antivirus with HelpSystems Insite for more details.
Insite now lists the endpoint's status as critical  , indicating the endpoint is not responding to health checks.
./avinsitectl start
./avinsitectl enable
Insite now lists the endpoint's status as good  , indicating it is now responding to health check requests.
See the HelpSystems Insite User Guide for more details on setting up and using HelpSystems Insite.
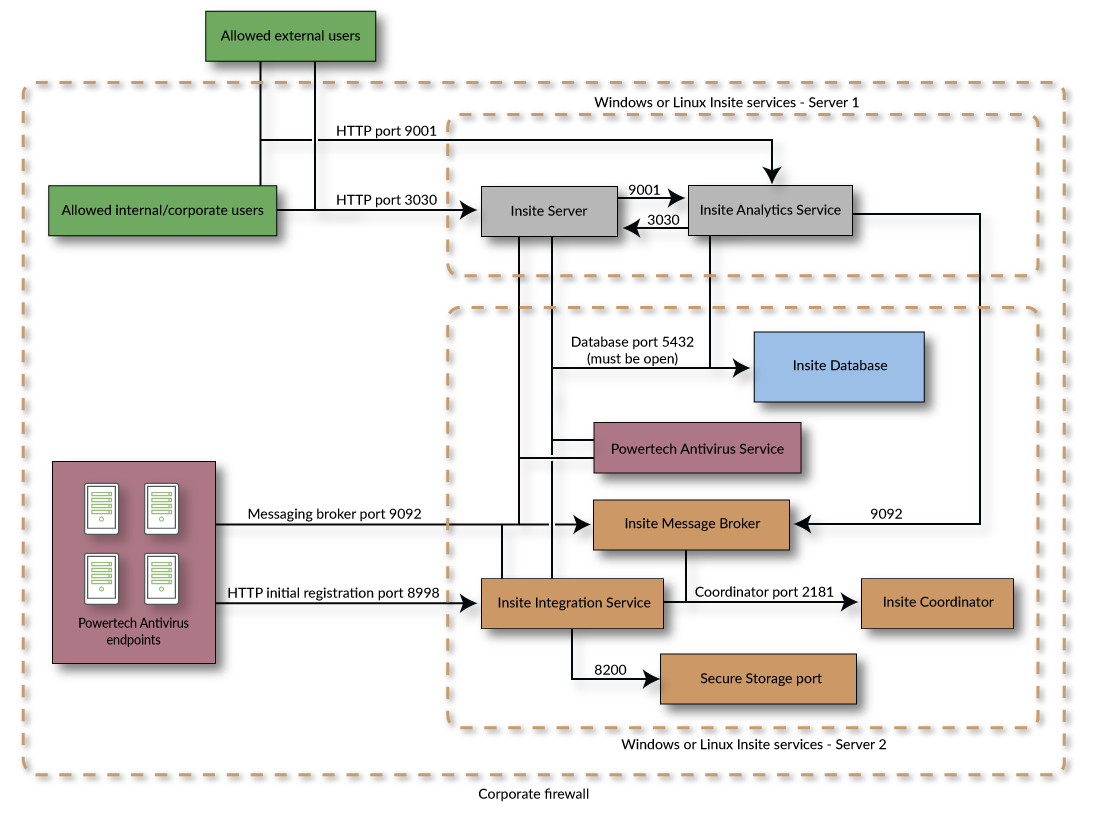
Port/Server Configuration
This is the mapping of the services HelpSystems Insite and Powertech Antivirus run and the ports used. The ports shown are default ports. If they are already in use during the installation, a different port is used.
The following ports must be open in order for Insite to function:
- 8998: HTTP port used for product registration (can be selectively enabled in firewall)
- 3030: Insite web port
- 9092: Communication port
The remaining ports are only used for local communication under a single server Insite installation.
Single server configuration

Dual server configuration
For a dual server installation, the database port (5432 by default) also needs to be open.
 Previous - Welcome