
Administrator Setup Procedure
After installation, complete the following procedure to configure Access Authenticator.
To Configure Access Authenticator
Configure Access Authenticator in HelpSystems Insite by configuring the general Access Authenticator settings, adding and configuring IBM i agents in Insite, configuring email settings, then adding and/or importing users to Access Authenticator.
Configure Access Authenticator Settings
The Settings screen includes several important settings related to authentication and general management of Access Authenticator. Review and configure all options available on the Settings screen prior to deploying Access Authenticator. See Settings Screen.
Add and Configure IBM i Agents in Insite
- Sign in to Insite and choose Access Authenticator from the Navigation Pane on the left.
- Click Systems Defaults to configure default agent settings. The Edit Default System screen appears. Here, you can:
- Choose whether or not to allow user profiles that have not been assigned to a user in Access Authenticator.
- Choose whether to allow or deny individual profiles for exit point sign on.
- Choose whether to activate Exit Points by default for new IBM i Agents when the agent is activated.
- When you have finished configuring the defaults, click Save.
- On the Navigation Pane, choose Agents, click IBM i Agent, then click Add to open the New System screen, where you can add an agent. Do the following to setup the agent:NOTE: Settings for individual systems in Edit Systems override the equivalent settings configured in Edit Default System screen.
- Choose Select System and choose the IBM i system.
- Select whether or not to allow profiles that have not been assigned in Access Authenticator.
- Choose how to handle sign on of unassigned profiles. You can set Use Agent Defaults to Off in order to specify a profile to use for unassigned profile sign ons. Or, choose On to use the default settings defined in the Edit Default System screen.
- Check the Exit Points you want to enable and click Activate.
- Click Save.
NOTE: If you choose to require authentication for Exit Point sign on, users will need to download the Desktop Agent from the User Portal during User Setup. Instructions for doing so are included under User Setup. - To enable the system, click
 and choose Activate.
 - Click Agents again in the navigation pane to show the IBM i agent option. If the "IBM i agent" row reads "Disabled", click for this option (on the right side of the screen) and choose Enable to enable IBM i agent service with Access Authenticator. You are asked if you want to change the statuses (activated or deactivated) of all systems connected to the agent. Choose Yes to do so and No to change only this system.
Add Groups
Before you begin adding Access Authenticator users, it is a good idea to create any Groups you would like to organize your users into. When users are organized into a Group, they can, for example, be enabled, disabled, or sent an email all at once. They can also be configured to use their own authentication method(s). (Users not assigned to a Group when added are assigned to the default group.)
- On the Navigation Screen, choose Users.
- Choose Add > Add Group. The New Group screen appears.
- Enter a Name and Description for the Group.
- Choose whether to Enable, Disable, or Inherit the five authentication methods.
- Click Save. This Group will not be available for selection when you add Access Authenticator Users.
Add Users
Access Authenticator must be added and linked to a profile on an IBM i agent system before registration or authentication can take place. Users can be added manually on an individual basis, or imported from Access Directory and created automatically.
Adding Users Manually
Access Authenticator Users can be created individually using the following procedure:
- In the Navigation Pane, choose Users, then Add > Add User to open the New User screen.
- Enter the Access Authenticator Name. This is the name the user will be instructed to use to, for example, login to the Access Authenticator User Portal during the registration procedure. It can be the same as the Active Directory account name or IBM i profile the user will be attached to.
- Enter the Active Directory Username, if one exists for the user. Skip this step if the user has only an IBM i profile, and no Active Directory Username.
- Enter the user's Full Name, email, and desired Group.
- For 'User Status,' set Enabled to Yes, which activates the user within Access Authenticator.
- For 'Authenticate User,' choose Yes if you want the user to be required to authenticate immediately, then next time they attempt to sign on to the IBM i. You can leave this set to No if you would rather wait and give the user time to register an authentication device before requiring them to authenticate.
- For Authentication Methods, select whether you want to enable or disable each method, or inherit settings from the Group settings.
- Link IBM i profiles with this Access Authenticator User:
- Under 'IBM i Profiles and Systems,' click Add.
- Select a system and choose Next.
- Select one or more profiles and choose Save.
- Repeat the above steps to add profiles from additional systems.
- Click Save to save the User in Access Authenticator's database.
Importing Users
Import users to expedite the process of creating Access Authenticator users using the following procedure:
- Import Active Directory users.
In order for Access Authenticator to authenticate a user, it must have its own record of the user enrolled in Access Authenticator's database. Access Authenticator can create these users automatically while importing Active Directory users. However, before importing IBM i user profiles, the Access Authenticator users must already exist.Import Active Directory users first. This way, your Access Authenticator users can be created quickly for every Active Directory user. Then, you can import IBM i user profiles and use Access Authenticator's Smart Match feature to link them to the existing Access Authenticator users that were created when you imported from Active Directory.
Any individual who does not have an Active Directory account must be imported manually. See Importing Users Manually.
- Configure LDAP using the LDAP Settings screen. To do so, in the Navigation Pane, click LDAP.
- Once LDAP has been configured, in the Navigation Pane, choose Users, then select Add > Import Users. The Import Users screen appears.
- For Location, choose Active Directory. For LDAP Context, enter the LDAP attributes you would like to use.
- For Group, select a Group for the users you are about to import. NOTE: To add a group, on the Users screen, click Add > Add Group. See Users screen for more details.
- Click Start Import. An Access Authenticator user is created for every Active Directory user.
- Import a list of IBM i user profiles and map them to the appropriate Access Authenticator users.
WARNING: Access Authenticator does not prevent the possibility of system access using the Program/procedure field by a user during sign on. To disable the use of this field for users, set their Limit Capabilities user profile setting to *YES or *PARTIAL.
- In the Navigation Pane, choose Users, then select Add > Import Users. The Import Users pane appears.
- For Import Type, choose IBM i Profiles.
- For System, select the IBM system that includes the profiles you would like to import.
- You can filter results using a string of up to ten characters.
- Set Smart Match to On if you want Access Authenticator to attempt to match profiles with existing Access Authenticator users. (See Import Users screen for more details.)
- Click Start Import to begin importing profiles. After import, use the 'Assign Users to IBM i Profiles' section to link Access Authenticator users with imported IBM i profiles. Tips:
- If Smart Match was enabled, use the
 icon to help identify matching users.
 - If the IBM i user was already assigned to an Access Authenticator user, the Access Authenticator user name appears in the column to the right of the Smart Match results.
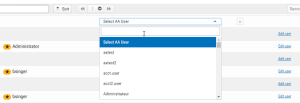
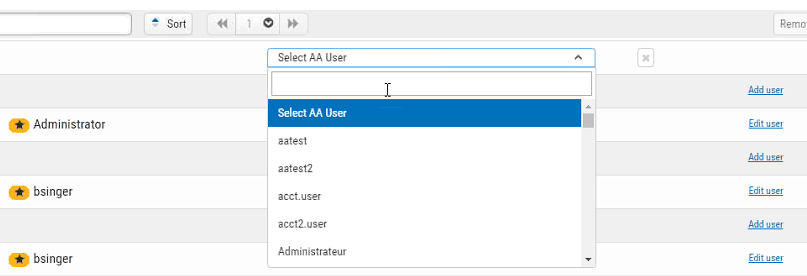
- Click Add User to display a menu that allows you to select an Access Authenticator user for the imported IBM i profile. Click within the text box and type to quickly identify the Access Authenticator user you would like to select, or use the scroll bar.
- Click Edit User to open the Edit User screen where you can edit user settings.
- If Smart Match was enabled, use the
Send Email to Users
After users have been added to Access Authenticator, they need to be informed how to register the device(s) they will be using for authentication. Access Authenticator provides administrators with a pre-configured (and customizable) email that can be used for this purpose. The email includes the Access Authenticator User name, and a link to the User Portal, which allows them to register devices.
Configuring Email Settings
- In the Navigation Pane, click Email to configure email settings. See Email Settings screen.
- For 'Enabled,' choose On to allow emails to be sent from Access Authenticator.
- For 'Host,' enter your organization's email server (e.g. smtp.yourcompany.com).
- For 'Port,' select the email server port. (The default is 25, the usual default smtp port.)
- Set 'Use SSL with Email' to On to secure the connection between Access Authenticator and your mail server.
- For 'Email,' enter the account you want in the From field for outgoing messages.
- Enter your login credentials.
- If desired, enter a custom message. For example, if you intend to enable Exit Point authentication, you might inform users that they will need to download and install the Desktop Agent from the User Portal during the registration process in order to authenticate Exit Point Sign ons.
- Click Preview User Portal registration email to preview the contents of the email. This is a representation of how the message will look to users.
- Click Save.
Sending a 'Welcome' Email to Users
- On the Navigation Pane, choose Users to go to the Users screen.
- Check the user(s) and/or group(s) you want to email.
- Click Send Email. A confirmation message appears.
- Click Send. An email is sent to the selected recipients.
Users will now be able to register devices using the User Portal and authenticate.
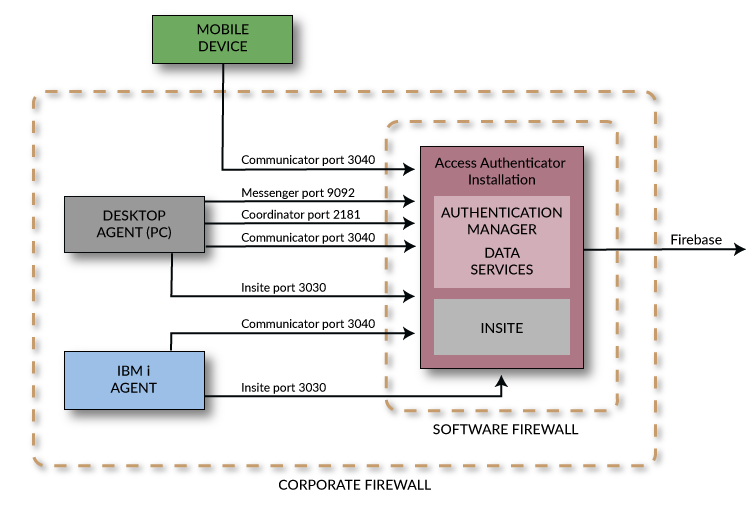
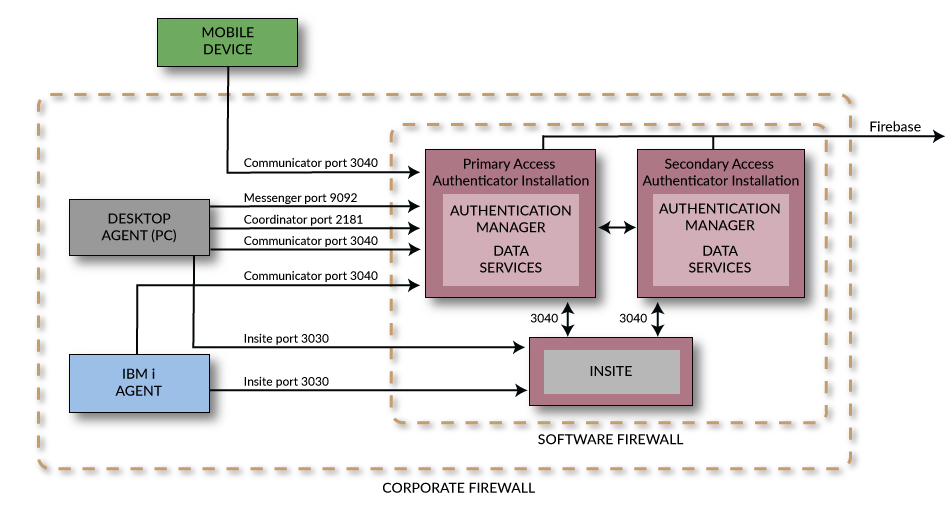
Port/Server Configuration Diagrams
The following diagrams show two possible Access Authenticator system configurations.
Basic Configuration
Basic Configuration with Failover Support
 Previous - Implementing