Installing Powertech Multi-Factor Authentication 
These instructions describe how to install Powertech Multi-Factor Authentication.
Before You Begin
Read this section before you install Powertech Multi-Factor Authentication.
System Requirements
The following requirements are necessary in order to install and run Powertech Multi-Factor Authentication.
Authentication Manager System Requirements
- Supported Linux OS Versions:
- RedHat Enterprise/Centos 7 & 8
- X86_64
- PPC64
- PPC64LE
- Suse Enterprise Linux 12 & 15
- X86_64
- PPC64LE
- Ubuntu Linux 19 & 20
- X86_64
- PPC64LE
- RedHat Enterprise/Centos 7 & 8
- Supported Windows OS Versions:
- Windows Server 2016
- Windows Server 2019
- For Linux, the /opt drive must have at least 20 GB of disk space.
- Version R01M07 of the Powertech Multi-Factor Authentication IBM i Agent (shipped with Powertech Multi-Factor Authentication 1.5).
- Version 3.5 of HelpSystems Insite.
- Version 1.5 of the Multi-Factor Authentication Desktop Agent (if authenticating on a PC).
The remaining system requirements for the Authentication Manager are the same as HelpSystems Insite. See Insite System Requirements.
IBM i Agent System Requirements
Powertech Multi-Factor Authentication requires IBM i 7.2 or higher.
The minimum supported IBM i agent for Powertech Multi-Factor Authentication 1.5 is R01M06.
Desktop Agent System Requirements
- Windows 10 64-bit, Windows 7 64-bit
- 2 GB RAM
Compatibility with HelpSystems Insite
Powertech Multi-Factor Authentication 1.5 requires Insite 3.5.
To use HelpSystems Insite to access your products through a web browser, you must meet the following browser and/or operating system requirements.
| Hardware Type | Minimum Browser and/or OS Requirements |
|---|---|
| Desktop/Laptop | Firefox 11 or higher Chrome 21 or higher Internet Explorer 11 Safari 6.1 or higher Microsoft Edge |
| Mobile Device | iOS: Browsers on iOS 8 or higher Android: OS 6.0 Marshmallow or higher Windows: OS 10 using Edge |
| IBM i | V7R2 or higher operating system |
For more details, see Insite System Requirements.
System Values
It is HelpSystems’s goal not to change system values on customer systems because we recognize that security-conscious organizations have rigorous change control processes in place for even small changes to system values. Therefore, we ask you to make any system value changes that are needed. However, the Powertech Multi-Factor Authentication IBM agent installation process could change a system value to allow the install to proceed if a system value is not set as specified below. If the Installation Wizard changes a system value during install, it changes it back to its original value when the install completes.
To install the Powertech Multi-Factor Authentication IBM i agent on your system, the following system values that control object restores must be configured as shown.
- Set QALWOBJRST to *ALWPGMADP (at a minimum) to allow the system to restore programs that adopt authority. Many Powertech programs adopt the authority of the product owner, rather than forcing you to give authority directly to administrators and end users. (Note: For some system configurations, *ALL is required temporarily.)
- QALWUSRDMN controls which libraries on the system can contain certain types of user domain objects. You should set the system value to *ALL or include the name of the Powertech Multi-Factor Authentication install library (PTMALIB) for the product to function properly.
- Set QVFYOBJRST to 1, 2, or 3. This allows Powertech Multi-Factor Authentication to restore all objects regardless of their signature. (Note: If you normally check signatures, remember to check this system value after the Powertech Multi-Factor Authentication install process completes.)
- Set QFRCCVNRST (Force conversion on restore) to 0, Do not convert anything.
Installing Powertech Multi-Factor Authentication
Powertech Multi-Factor Authentication installation on your network is a multi-step process that requires several installation procedures. The following entities should be installed in the order listed here:
- HelpSystems Insite. This is required for administrator setup and the User Portal. See HelpSystems Insite Documentation List for instructions that describe how to install and use HelpSystems Insite.
NOTE: You must create an Insite user profile before creating the Insite Product Connection to Powertech Multi-Factor Authentication. See "Profiles" in the HelpSystems Insite User Guide.WARNING: Credential validation requests are made using the Insite connection profile. If the TCP Signon Server is active and the Insite connection profile has been configured to be prompted to authenticate, the authentication process will interfere with the user credential validation process. We therefore recommend that the Insite connection profile is not set up to be authenticated using Powertech Multi-Factor Authentication.
- Powertech Multi-Factor Authentication Authentication Manager and Data Services. The Authentication Manager is Powertech Multi-Factor Authentication's central processing component. Data Services include database and high-availability services used by the Authentication Manager. See Installing the Authentication Manager and Data Services.
- Powertech Multi-Factor Authentication IBM i agent. The IBM i agent software must be installed on all systems to be secured by Powertech Multi-Factor Authentication. See Installing the IBM i Agent.
After Powertech Multi-Factor Authentication has been installed and started, network users need to install up to two applications, depending on the method of authentication being used (see User Setup for details):
- Powertech Multi-Factor Authentication Mobile app. The mobile app is required in order to authenticate with a mobile device. (This installation is not necessary if a YubiKey is being used for the second authentication factor.)
- Powertech Multi-Factor Authentication Desktop agent. The Desktop Agent allows users to authenticate using a desktop computer as an alternative to the IBM i green screen agent for Exit Point sign on.
Installing the Authentication Manager and Data Services with Failover Support
While Powertech MFA can be operated with a single Authentication Manager instance, in order to provide redundancy in the case of server failure, HelpSystems provides a multi-server deployment that allows for two, three, or more Authentication Manager instances.
Before installing the Powertech Multi-Factor Authentication Authentication Manager, identify the systems that will be used for failover support. These must be configured as part of the installation process. One-, two-, and three-system deployments are possible. A three-system deployment is recommended. Additional systems can be added, further enhancing the integrity of the implementation. At this time, failover is not supported on heterogenous environments—all systems must have like operating systems (all Windows or all Linux).
If this is an upgrade, a previous two-system deployment already includes a Primary and Secondary server. If this is a new installation, commission the available servers that will be used for your Powertech Multi-Factor Authentication implementation.
Application Layer
The application layer in the context of Powertech MFA failover is the mechanism that controls the location of the PostgreSQL master, and the list of the standby systems.
Two-system vs three-system deployment
A three-system deployment is the ideal configuration for Powertech Multi-Factor Authentication failover because, in this environment, replication is always running. In the standard two-system deployment, it is possible for processes to lose the provided High Availability. For example, if an implementation includes only two systems, and maintenance is required on one of those systems, failover processes start when the first system is taken down for maintenance. At that point, there is no replication running for the second system as it is promoted to a master server. While no implementation is guaranteed, a three-system deployment provides continuous replication and HA capabilities.
Primary and Secondary definitions
In previous Powertech MFA versions, a server was designated as either Primary or Secondary. These terms are still used, but they have a slightly different meaning as of Powertech MFA 1.5. "Primary" was previously a static definition, such as 'System1 is the primary server and System2 is the secondary.' Failing over to the Secondary did not make it the new “Primary.” Instead, the Secondary had its database promoted to be the master. When the “Primary” system was restored to service, the process would “Failback,” promoting System1's database back to master.
As of Powertech MFA 1.5, the process is more dynamic. The Primary server is the node in which the database is assigned to master. When failover is initiated, whatever node has its database promoted becomes the Primary server. There is no longer a “Failback” procedure. Instead, the status of the server configuration can be updated manually.
Port Assignment
During the installation process, you will be asked to designate the ports that are required for Powertech MFA's services. While the default ports can be changed as might be required by, for example, institutional policies, the port numbers for each service should be the same in each installation. As such, prior to installation, designate a port number for each service that is available on each server you intend to use in your Powertech MFA deployment. Firewall setting must allow for communication over these ports.
The default port numbers are:
- Shutdown Port: 3039
- Connector Port: 3040
- Messenger SSL Port: 4707
- Messenger TCP Port: 61616
- Database Port (PostgreSQL): 6432
See Port Descriptions for additional details.
Transport Layer
ActiveMQ natively supports HA. As indicated in the following installation procedure, the IP address for each node must be entered for each server installation in a deployment. However, once complete, HA is available across all nodes for ActiveMQ. Active MQ is a critical support function for the application layer.
Since the application is using the native HA capability with ActiveMQ, the master database (application layer controlled) can exist on a different node than the transport layer.
Failover Notifications
Powertech MFA can be configured to send notifications anytime failover is triggered automatically due to a system outage. Configure failover notifications in the Failover Notification section of the Settings screen.
Installing the Authentication Manager and Data Services with Failover Support on Linux
- Login as root on the server you want to use as your Primary installation. The installer must be run as root or with sudo.
- Download the Powertech Multi-Factor Authentication for Linux file (installPowertechMFA.tgz) to a temporary directory on the system from the Powertech Multi-Factor Authentication download page. (The "Trial" download is the full product, which can be unlocked with a valid License Key.) If you intend to deploy failover with two or more servers, the installer must be downloaded (or otherwise transferred) to each server being used. The installation procedure must be run on each server being included in the Powertech MFA deployment.
- Use the following command to extract the contents of the file:
tar xvzf installPowertechMFA.tgz
Files are extracted to the directory installPowertechMFA.
- Use the following commands to start the installer:
cd installPowertechMFA
./serverInstall
-
When prompted to choose whether you want to use the default ports, either indicate y accept and proceed, or n to change the ports used.
NOTE: In order to use Powertech MFA, your firewall must allow communication over the ports configured here. -
When prompted to provide the ActiveMQ IP address list, enter the IP addresses of the servers being used for this implementation, separated by semicolons (;). The order of the IP addresses entered here must be the same for each Powertech MFA Authentication Manager installation included in this deployment.
EXAMPLE:

- When prompted to verify the server IP, confirm it is correct. Or, if it is not correct, enter n, then enter the correct IP.
- Powertech Multi-Factor Authentication creates the Primary database and starts the product. It installs to /opt/helpsystems/PowertechMFA.
- Open HelpSystems Insite and open the Powertech MFA module.
- In the Navigation Pane, click Managers.
- Click Add. The New Manager screen appears. Enter the IP Address of the first server in this deployment, enter the license key, and click Save. Repeat this step for the additional servers in this deployment.
-
In the Navigation pane, choose Server Health and Failover. All servers configured should appear in this table. The Primary server's name is listed in blue. For a full description, see Server Health and Failover screen. A
 in the Authentication Manager and Database Service columns indicate the services are active and ready for you to proceed with the remaining secondary installations.
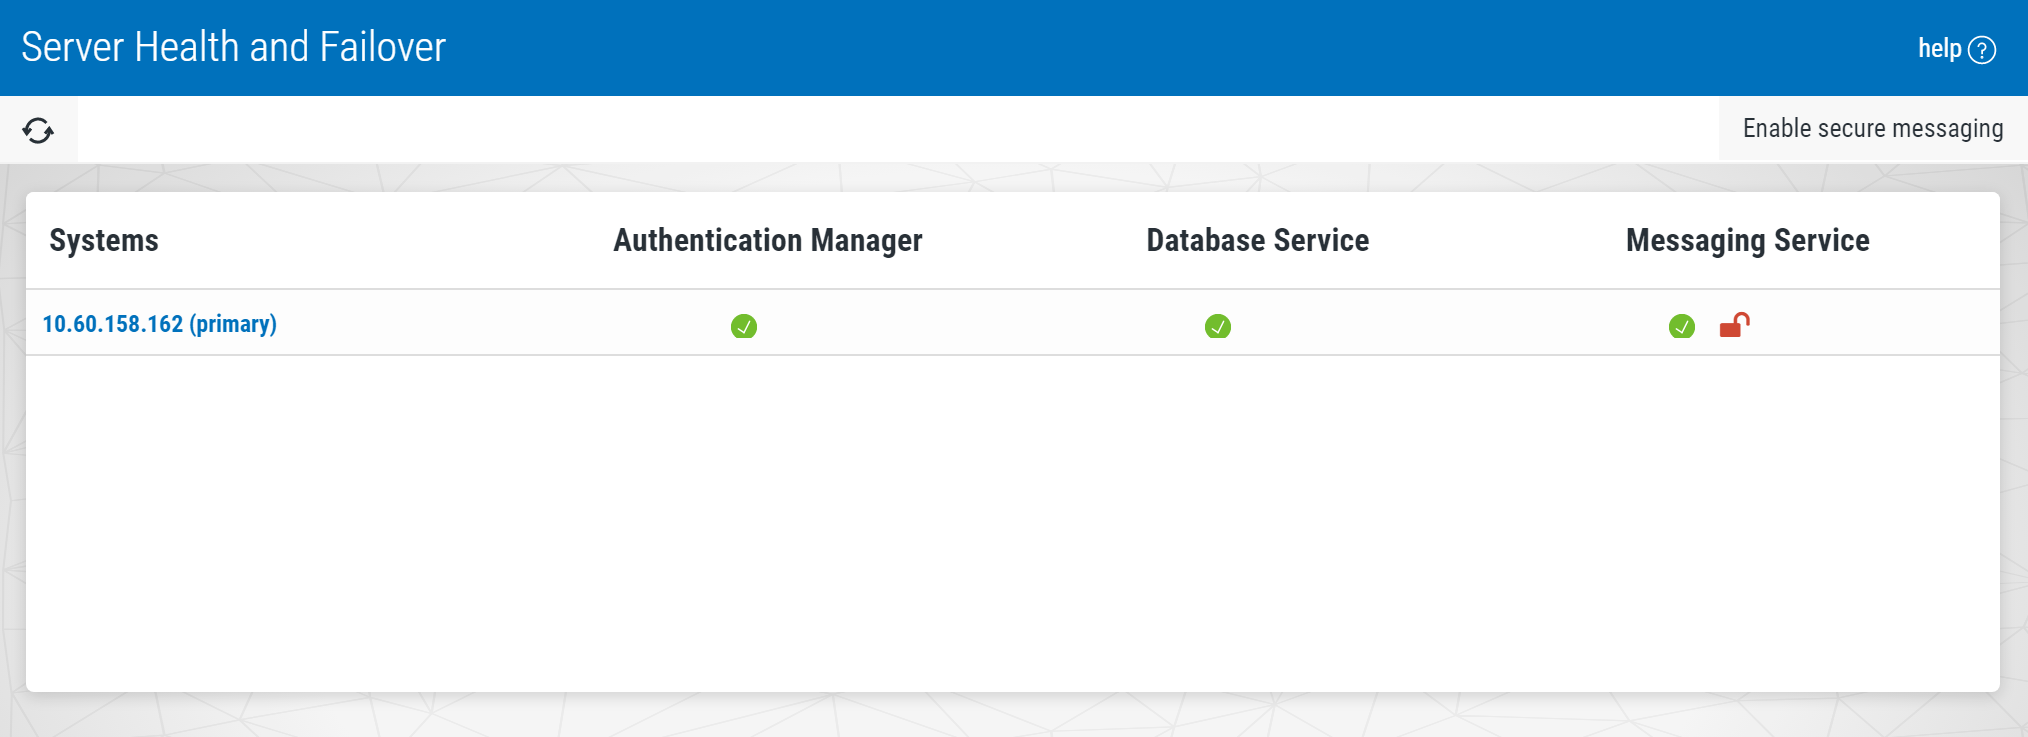
As mentioned previously, the application layer handles governance of the leader. The terms leader and master are basically synonymous. Leader pertains to the application layer, which determines the database master. The leader and master are synchronized with one another. If the leader changes, as does the master database, and vice versa. In our recommended three-system deployment, when system 1 fails for any reason, system 2 becomes the leader, and the database is promoted to the master. All other instances are designated secondary and stream from the new master (system 2). To initiate failover manually, see Manual Failover.
-
After you have confirmed the Primary server's Authentication Manager and Database Service are active, repeat steps 2-8 for all additional servers included in this deployment. Be sure the ports and Server List entry is identical for each installation.
To secure the messaging service, see Enabling Secure Messaging.
Installing the Authentication Manager and Data Services with Failover Support on Windows
- Download the Powertech Multi-Factor Authentication installer (setupPowertechMFA.exe) from the Powertech Multi-Factor Authentication download page. (The "Trial" download is the full product, which can be unlocked with a valid License Key.) If you intend to deploy failover with two or more servers, the installer must be downloaded (or otherwise transferred) to each server being used. The installation procedure must be run on each server being included in the Powertech MFA deployment.
- Double-click the installer file to begin the installation process.WARNING: If you need to terminate the installation process before finishing, delete the C:\Program Files\Help Systems\Powertech MFA folder and start the installer again.
- Follow the instructions to continue the installation.
- When the HelpSystems Access Manager and Data Services Configuration Manager appears, configure ports for the manager and services.
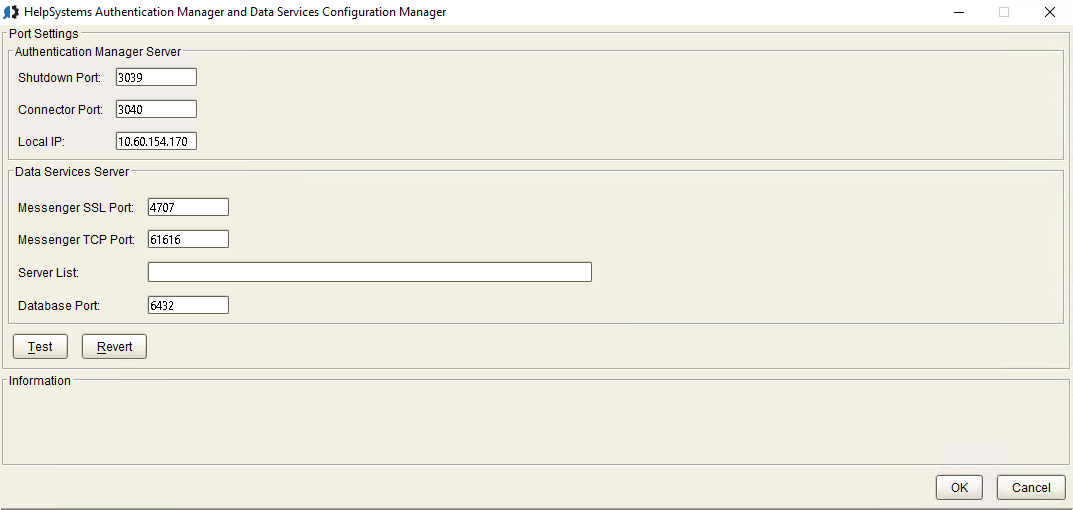 NOTE: In order to use Powertech MFA, your firewall must allow communication over the ports configured here.
The installer informs you if the default ports are available. If a port is not available, enter a new port number and click Test to see if it is available.
- For Server List, enter the IP addresses of the servers being used for this implementation, separated by semicolons (;). The order of the IP addresses entered here must be the same for each Powertech MFA Authentication Manager installation included in this deployment.
- Click OK to save the ports and continue installation. See also Port Descriptions.
- Click Finish to complete installation on the Primary server.
- Open HelpSystems Insite and open the Powertech MFA module.
- In the Navigation Pane, click Managers.
- Click Add. The New Manager screen appears. Enter the IP Address of the first server in this deployment, enter the license key, and click Save. Repeat this step for the additional servers in this deployment.
-
In the Navigation pane, choose Server Health and Failover. The server you have just configured should appear in this table, and be marked "primary." For a full description, see Server Health and Failover screen. A
in the Authentication Manager and Database Service columns indicate the services are active and ready for you to proceed with the remaining secondary installations.
As mentioned previously, the application layer handles governance of the leader. The terms leader and master are basically synonymous. Leader pertains to the application layer, which determines the database master. The leader and master are synchronized with one another. If the leader changes, as does the master database, and vice versa. In our recommended three-system deployment, when system 1 fails for any reason, system 2 becomes the leader, and the database is promoted to the master. All other instances are designated secondary and stream from the new master (system 2). To initiate failover manually, see Manual Failover.
- After you have confirmed the Primary server's Authentication Manager and Database Service are active, repeat steps 2-7 for all additional servers included in this deployment. Be sure the ports and Server List entry is identical for each installation.
Enabling Secure Messaging
Enable secure messaging to set the 'use SSL' flag to true on each node and automatically import the SSL certificates into each node’s Keystore.
To enable secure messaging
-
In the Navigation pane, choose Server Health and Failover. The Server Health and Failover screen appears.
A
 icon indicates secure messaging is not enabled for a server.
 -
Click Enable Secure Messaging. A message appears indicating that submitting this request will secure the messaging service on all servers that are currently using an insecure connection, and that this will restart the authentication managers.
NOTE: Authentication may be unavailable for a few seconds when enabling secure messaging. - Click Yes to confirm. A
 icon in the Messaging Server column indicates secure messaging has been enabled for the server.
Installing the IBM i Agent
Ensure the following servers are available and running prior to installation:
- FTP Server
- Remote Command Server
Do the following to perform the installation or update:
- Download the Powertech Multi-Factor Authentication installer (setupPowertechMFA_IBMi.exe) to your PC from the Powertech Multi-Factor Authentication download page.
- On the Choose Components panel, select which components you want to install. You can choose to install the Manuals and the Software for IBM i. Click Next.
- If you are installing the Manuals only, the process completes and the installer closes. The Manuals have been installed. You can skip the rest of these steps.NOTE: The manuals are installed to the following location:
C:\Program Files\PowerTech\Powertech MFA\manuals -
On the IBM i Details panel:
- Select or enter the IBM i system.
- Enter a user profile and password that is a member of the user class *SECOFR and has at least the following special authorities: *ALLOBJ, *SECADM, *JOBCTL, *IOSYSCFG, and *AUDIT. The user profile should have Limit capabilities set to *NO.
- (Optional) In the Advanced Settings section:
- Enter a port number or use the arrows if you want to change the FTP port number to something other than the default of 21.
- Select Secure File Transfer if you want to use FTPS (FTP over SSL) during the file transfer. The default FTPS secure port is 990, but it can be changed to the required secure port for your environment.
- In the Timeout (seconds) field, enter the number of seconds the session should be kept active during an FTP transfer. You can choose anywhere between 25 and 1800 seconds (30 minutes).NOTE: If the transfer takes longer than the amount of time specified, the session will expire.
-
Click Next.
-
You have two options on the Product Load Options panel:
-
Click Immediate Load if you’d like to load the product on the IBM i now.
-
Click Staged Load if you’d like to transfer the objects now and load them on the IBM i at a later time.
NOTE: See "Loading Staged Objects on the IBM i" (below) for instructions on how to load the staged objects on your selected IBM i system.
-
-
The Product Load Progress panel for Powertech Multi-Factor Authentication launches.
If the Product Load Progress panel ends with an overall Failed message, the product upload could not complete properly. To find the reason the upload failed, click View Logs and review your logs. You can also use Download at the top of the logs to save the information for future review.
When the processing is complete, you have two choices:
- If this is the only installation or update of Powertech Multi-Factor Authentication that you're doing, click Finish.
- If you have installs or updates to do on other IBM i systems, click Restart. Then, return to step 4.
Loading Staged Objects on the IBM i
If you chose to stage your objects during step 5b of the installation or update process, do the following to manually load them on the IBM i you identified above.
-
On the IBM i, execute the following command to display the Work with Loads panel:
HSLOADMGR/HSWRKLOAD
-
Enter option 1, Load, next to the Load Name for Powertech Multi-Factor Authentication and press Enter.
The installation program installs Powertech Multi-Factor Authentication, including the required user profiles and libraries (see table below for details).
The installation process displays the job log name, user, and job log number. Use the WRKSPLF command to display the job log for complete information on the Powertech Multi-Factor Authentication install.
Objects Installed on System
| Installed on System | Description |
|---|---|
|
Product Library |
PTMALIB |
|
User Profiles |
PMAADMIN, which has special authorities *ALLOBJ, *AUDIT, *IOSYSCFG, *JOBCTL, *SAVSYS, *SECADM, *SERVICE, and *SPLCTL
|
|
Authorization List |
PMAADMIN - Powertech Multi-Factor Authentication Administrators |
|
Subsystem |
PMASBS |
|
Job Queue Entries |
PTMALIB/PMAJOBQ added to PMASBS |
|
Objects in QGPL: |
Depending on the exit points that are being monitored, there could be up to four programs starting with PMA created in QGPL. |
|
Powertech-created Unregistered Exit Points: |
POWERLOCK_AA |
After You Are Done
Congratulations! Powertech Multi-Factor Authentication is now installed. Read the following for additional information and next steps.
Configuring the IBM i Agent
After installation, you need to add any profiles that will require access to the IBM i agent's configuration settings to the PMAADMIN authorization list. Then, configure the IBM i agent to synchronize with Insite and the Authentication Manager.
- Sign on to the IBM i system and add the product administrator's user profile to the PMAADMIN authorization list:
WRKAUTL PMAADMIN
- Choose 2 to edit for the PMAADMIN authorization list.
- Press F6 and add the user profile. Object Authority should be set to *ALL.
- Repeat steps 1-3 for any other product administrators.
- Use the following command to open the Main Menu:
PTMALIB/WRKPTMA
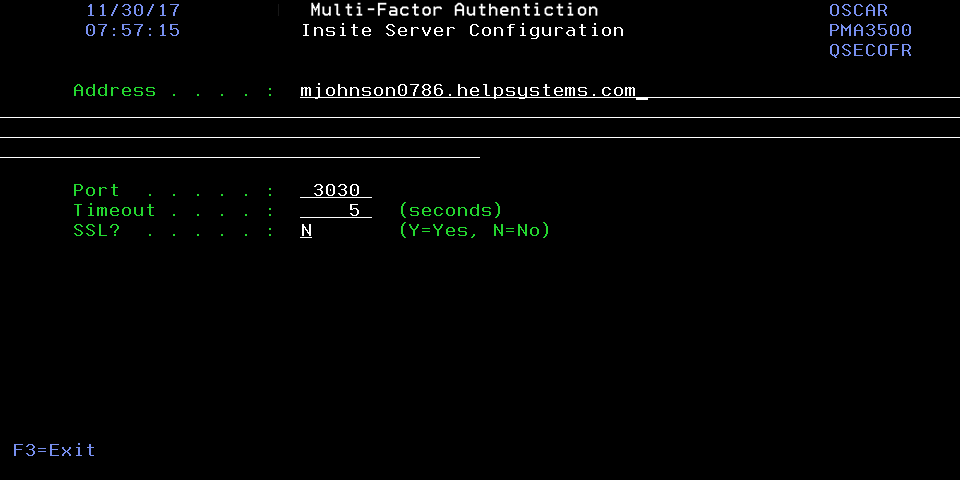
- Choose option 1 to open the Insite Server Configuration panel.
- Enter the IP address or DNS name (e.g. on Windows, the full computer name) and the port of the Insite server. The default port is 3030.
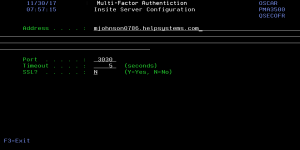
Press Enter to save changes.
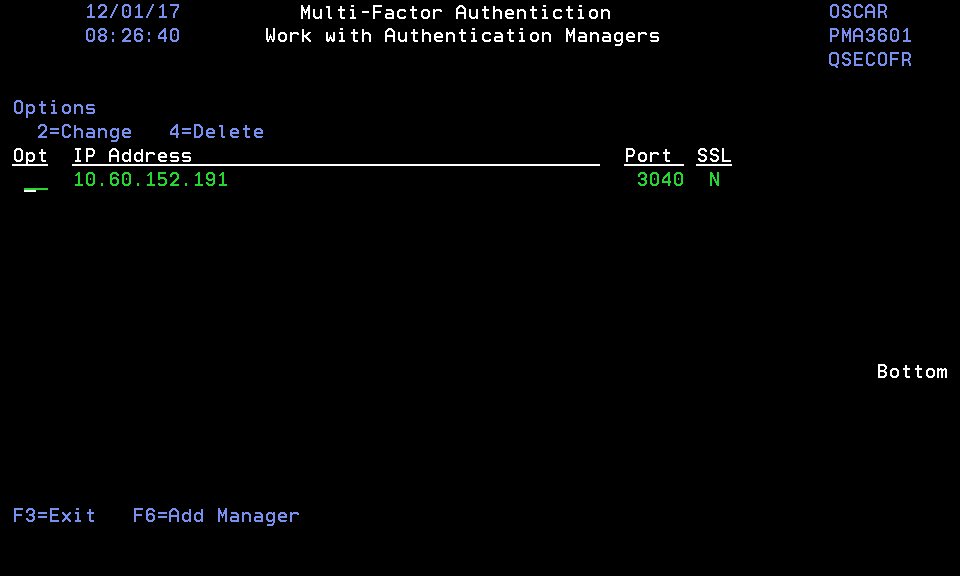
- Press F3 to return to the Main Menu, then choose option 2. The Work with Authentication Managers panel appears. If you have already installed the Authentication Manager and Data Services, and added the Authentication Manager IP(s) to Insite, they appear here automatically.
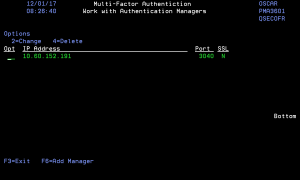 NOTE: If you have not yet installed/configured an Authentication Manager, you can press F6 to add it here manually before it has been installed/added to Insite. (You will need to know the IP and port it will be installed on.)
 - Press F3 to return to the Main Menu, then choose option 4. The Emergency Override Setup panel appears.
- Enter any profiles that will be allowed to bypass authentication in case of an emergency. Press Enter. The IBM i agent has been configured.NOTE: Choose option 3 to stop authentication on this IBM i system. See Deactivate Authentication Verification panel for details.
Next, you need to add the IBM i agent to Powertech Multi-Factor Authentication in Insite.
- Open HelpSystems Insite and choose Powertech Multi-Factor Authentication from the navigation pane on the left, then choose Agents.
- Ensure the IBM i system has been added as a product connection in Insite. See "Product Connections" in the Insite documentation.
- If IBM i agent is Disabled, click
 on the right side of the IBM i agent row and select Enable.
 - Click IBM i agent, then click Add. The Agents > New System screen appears.
- For System, choose Select System and choose the system you just configured.
- Configure any system settings and click Save. You return to the Agents > IBM i agent screen.
- To activate the system, click (on the right side of the screen) and choose Enable.
When the necessary components have been installed, see Administrator Setup Procedure to begin configuring and using Powertech Multi-Factor Authentication.
Starting and Stopping the IBM i Agent for Backups
When started, the Powertech Multi-Factor Authentication IBM i agent places a lock on ptmalib, which can interfere with system backup procedures. For this reason, and also in order to facilitate the addition of Powertech Multi-Factor Authentication into the startup program, the following commands are available:
- PMASTRMON - Start Powertech Multi-Factor Authentication
- PMAENDMON - Stop Powertech Multi-Factor Authentication
When backing up your system, use PMAENDMON to deactivate the agent and remove the object lock. After the backup is complete, use PMASTRMON to start the agent. If you are performing a backup with IPL, you can incorporate these commands into your backup procedure either manually or using scripts in a backup tool like Robot Save or BRMS.
Contacting Us
For additional resources, or to contact Technical Support, visit the HelpSystems Community Portal at https://community.helpsystems.com.