
Installing Access Authenticator
These instructions guide you through the process of installing Access Authenticator.
System Requirements
Compatibility with HelpSystems Insite
To use HelpSystems Insite to access your products through a web browser, you must meet the following browser and/or operating system requirements.
| Hardware Type | Minimum Browser and/or OS Requirements |
|---|---|
| Desktop/Laptop | Firefox 11 or higher Chrome 21 or higher Internet Explorer 11 Safari 6.1 or higher Microsoft Edge |
| Mobile Device | iOS: Browsers on iOS 8 or higher Android: OS 4.4 or higher using Chrome Windows: OS 10 using Edge |
| IBM i | V7R1 or higher operating system |
For more details, see Insite System Requirements.
Authentication Manager System Requirements
See Insite System Requirements.
IBM i Agent System Requirements
Access Authenticator requires IBM i (i5/OS, OS/400) version V7R1 or higher.
System Values
It is HelpSystems’s goal not to change system values on customer systems because we recognize that security-conscious organizations have rigorous change control processes in place for even small changes to system values. Therefore, we ask you to make any system value changes that are needed. However, the Access Authenticator IBM agent installation process could change a system value to allow the install to proceed if a system value is not set as specified below. If the Installation Wizard changes a system value during install, it changes it back to its original value when the install completes.
To install the Access Authenticator IBM i agent on your system, the following system values that control object restores must be configured as shown.
- Set QALWOBJRST to *ALWPGMADP (at a minimum) to allow the system to restore programs that adopt authority. Many Powertech programs adopt the authority of the product owner, rather than forcing you to give authority directly to administrators and end users. (Note: For some system configurations, *ALL is required temporarily.)
- QALWUSRDMN controls which libraries on the system can contain certain types of user domain objects. You should set the system value to *ALL or include the name of the Access Authenticator install library (PTMALIB) for the product to function properly.
- Set QVFYOBJRST to 1, 2, or 3. This allows Access Authenticator to restore all objects regardless of their signature. (Note: If you normally check signatures, remember to check this system value after the Access Authenticator install process completes.)
- Set QFRCCVNRST (Force conversion on restore) to 0, Do not convert anything.
Desktop Agent System Requirements
- Windows 7 64-bit or Windows 10 64-bit
- 2 GB RAM
Mobile App System Requirements
Biometric authentication on Android to devices requires Android 6.0 Marshmallow or newer.
Installation Overview
Access Authenticator installation on your network is a multi-step process that requires several installation procedures. The following entities should be installed in the order listed here:
- HelpSystems Insite. This is required for administrator setup and the User Portal. See HelpSystems Insite Documentation List for instructions that describe how to install and use HelpSystems Insite.
NOTE: You must create an Insite user profile before creating the Insite Product Connection to Access Authenticator. See Profiles in the HelpSystems Insite User Guide.
- Access Authenticator Authentication Manager and Data Services. The Authentication Manager is Access Authenticator's central processing component. Data Services include database and high-availability services used by the Authentication Manager. See Installing the Authentication Manager and Data Services.
- Access Authenticator IBM i agent. The IBM i agent software must be installed on all systems to be secured by Access Authenticator. See Installing the IBM i Agent.
After Access Authenticator has been installed and started, network users need to install up to two applications, depending on the method of authentication being used (see User Setup for details):
- Access Authenticator Mobile app. The mobile app is required in order to authenticate with a mobile device. (This installation is not necessary if a YubiKey is being used for the second authentication factor.)
- Access Authenticator Desktop agent. The Desktop Agent allows users to authenticate using a desktop computer as an alternative to the IBM i green screen agent for Exit Point sign on.
Installing the Authentication Manager and Data Services
Access Authenticator can run in two modes:
- Single System: The Authentication Manager and Data Services are installed on the same system. This is the easiest installation that requires the smallest footprint. This is the recommended configuration for the first system.
-
Multiple Systems with Manual Failover: In this configuration, the Authentication Manager and Data Services are installed on a second system (same as the first), but the installation points back to the Primary system to replicate its data. The second system can be switched to the Primary system in the event of a system failure, or for maintenance on the Primary system.
The following instructions demonstrate how to install the Authentication Manager and Data Services on a Primary and Secondary system in order to provide replication and failover capability. If you intend to install on a single system only, use the initial steps of the following procedure for your platform (stopping when directed to repeat steps for a Secondary system).
To install the Access Authenticator Authentication Manager and Data Services on Windows
- Login to the Windows server you would like to use for your Primary installation.
- Download the Access Authenticator installer (setupAccessAuthenticator.exe) from the Access Authenticator download page. (The "Trial" download is the full product, which can be unlocked with a valid License Key.)
- Double-click the installer file to begin the installation process.WARNING: If you need to terminate the installation process before finishing, delete the C:\Program Files\Help Systems\Access Authenticator folder and start the installer again.
- Follow the instructions to continue the installation.
-
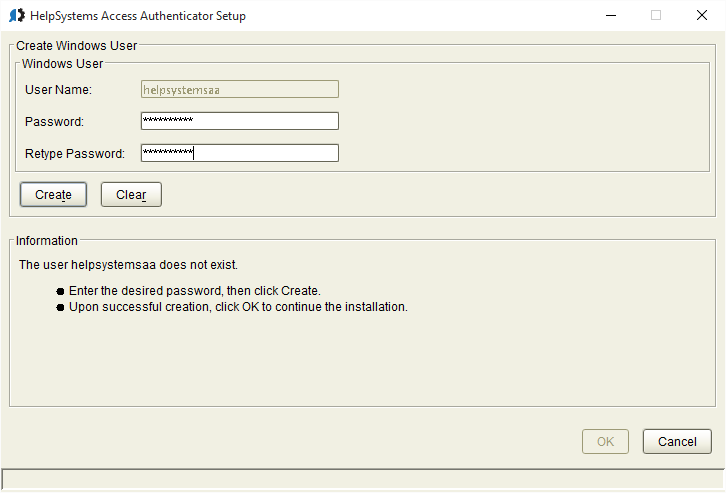
The Access Authenticator Create Windows User window prompts you to create a new Windows user named helpsystemsaa. Enter a password for the new user and click Create. Once the password is accepted, click OK to continue installation.
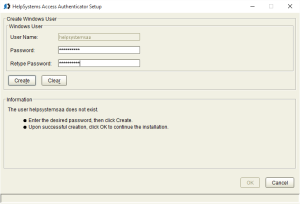 NOTE: If you are reinstalling Access Authenticator over a previous version, you will not see this window.
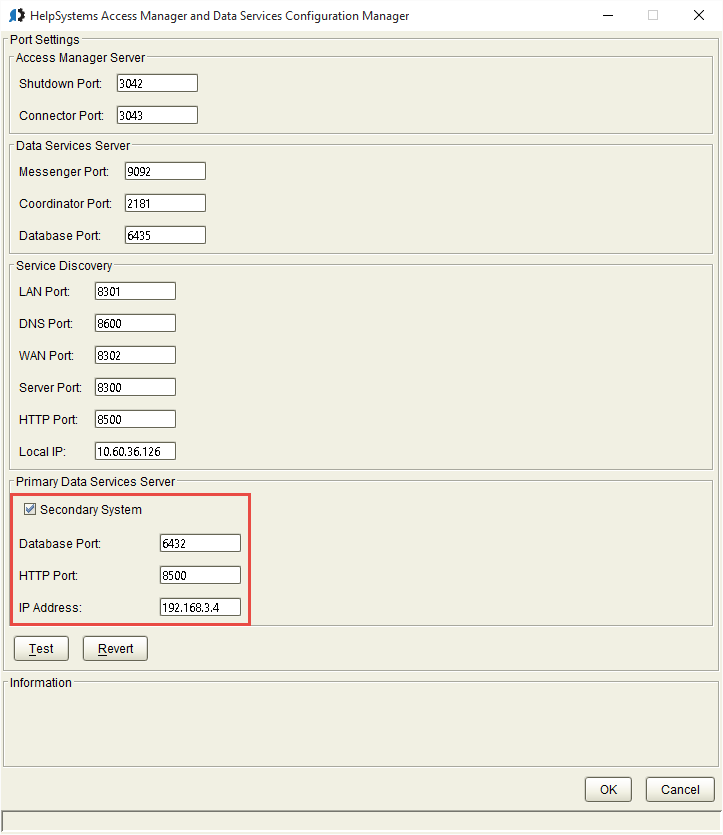
 - The HelpSystems Access Manager and Data Services Configuration Manager appears. You must configure ports for the manager and services. The installer lets you know if the default ports are available. If a port is not available, enter a new port number and click Test to see if it is available.
Make note of the Database Port and HTTP Port. Also note the Local IP address. These will need to be entered later.
Once all ports are available, click OK to save the ports and continue installation. See also Port Descriptions. - Click Finish to complete installation on the Primary server.
- Login to the Windows server you would like to use for your Secondary installation.
- Repeat the installation process on this server until you reach the HelpSystems Access Manager and Data Services Configuration Manager screen (steps 1-5).
Check Secondary System. Then, enter the Database Port and HTTP port specified for the Primary server. For IP Address, enter the IP address of the Primary server.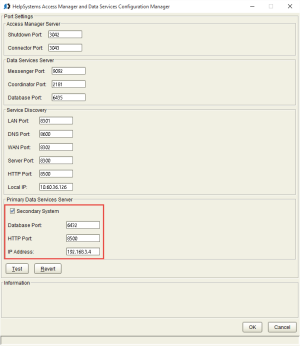
If a port is not available, enter a new port number and click Test to see if it is available. Once all ports are available, click OK to save the ports and continue installation.
- Click Finish to complete installation on the Secondary system.
- On the Secondary system, open a command line and run the following command in the Access Authenticator directory (C:\Program Files\Help Systems\Access Authenticator by default):
master2standby.bat -a ip address of primary system -p database port of primary system
This tells Access Authenticator to begin replicating data from the Primary system.NOTE: You can look at the "PortConfig.txt" file on the Primary system to view the port configuration, including the Database Port. This file is located atNext, you need to add the IP addresses and ports of the Primary and Secondary systems you have just installed in HelpSystems Insite, which is the browser interface used to administer Access Authenticator.C:\Program Files\Help Systems\Access Authenticator. - Open HelpSystems Insite and choose Access Authenticator from the Navigation Pane. (See HelpSystems Insite Documentation List for Insite installation instructions if you have not yet installed Insite.)
- Choose Managers from the Navigation Pane and click Add to add an Authentication Manager. Or, if you have already added the Primary Manager (e.g. for licensing), click
 next to the Manager and choose Edit.
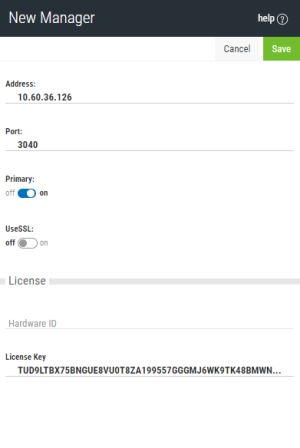
 - Specify the Address and Port of the Primary system (recorded earlier), then set Primary to On. Enter a valid License Key if you have not already.
 TIP: To verify a system is configured to be the Primary Authentication Manager instance, you can run the command
is-master.bat(located in the Access Authenticator folder). If it is Primary, the command will returnPOSTGRES_MASTER=TRUE. - Click Save. The Primary system is added to the list of Managers.
- Click Add. Or, if you have already added the Secondary Manager, click next to the Manager and choose Edit. Now, enter the IP address and Port of the Secondary Authentication Manager system. Leave the Primary setting at Off. Enter a valid License Key if you have not already.
- Click Save. The Secondary system is added to the list of Managers. To promote a Secondary Authentication Manager to Primary in case of a system failure or maintenance, see Promoting a Secondary Authentication Manager to Primary.NOTE: You can view the IP addresses and ports of Primary (master) and Secondary databases in the pckz.properties file located in the Access Authenticator/properties folder.

To install the Access Authenticator Authentication Manager and Data Services on Linux
- Login as root on the server you want to use as your Primary installation. The installer must be run as root or with sudo.
- Download the Access Authenticator for Linux file (installAccessAuthenticator.tgz) to a temporary directory on the system from the Access Authenticator download page. (The "Trial" download is the full product, which can be unlocked with a valid License Key.)
- Use the following command to extract the contents of the file:
tar xvzf installAccessAuthenticator.tgz
Files are extracted to the directory installAccessAuthenticator.
- Use the following commands to start the installer:
cd installAccessAuthenticator
./serverInstall
- When prompted to choose whether you want to install the Authentication Manager and Data Services, choose y.
- When asked if this is the primary data services server, indicate y.
- When prompted to verify the server IP, confirm it is correct. Or, if it is not correct, enter n, then enter the correct IP.
- Next you are prompted to confirm a series of ports Access Authenticator uses for communication. Verify the ports are correct. Record the LAN port number and the Database port number, as you will need to enter these later if you are installing a Secondary instance.
- Access Authenticator creates the Primary database and starts the product. It installs to /opt/helpsystems/AccessAuthenticator.
- Login to the server you want to use for your Secondary installation and repeat the above process through step 4.
- When asked if this is the primary data services server, indicate n. The Data Services must be running for the following steps to work.
- Enter the IP of the primary system (the one just installed).
- Enter the port number of the primary database (recorded earlier). NOTE: You can look at "PortConfig.log" in the installAccessAuthenticator directory on the Primary system to view the port configuration, including the Database Port.
- Enter the port number for the primary Discovery LAN (recorded earlier). NOTE: If a firewall is preventing communication between the servers, create rules in the firewall to allow the required traffic.
- When prompted to verify the server IP, confirm it is correct. Or, if it is not correct, enter n, then enter the correct IP.
- You are prompted to confirm a series of ports Access Authenticator uses for communication. Verify the ports are correct.
- Access Authenticator creates the Secondary database and starts the product. It installs to /opt/helpsystems/AccessAuthenticator.
Next, you need to add the IP addresses and ports of the Primary and Secondary systems you have just installed in HelpSystems Insite, which is the browser interface used to administer Access Authenticator. - Open HelpSystems Insite and choose Access Authenticator from the Navigation Pane. (See HelpSystems Insite Documentation List for Insite installation instructions if you have not yet installed Insite.)
- Choose Managers from the Navigation Pane and click Add to add an Authentication Manager. Or, if you have already added the Primary Manager (e.g. for licensing), click next to the Manager and choose Edit. The New Managers screen appears.
- Specify the Address and Port of the Primary system (recorded earlier), then set Primary to On. Enter a valid License Key if you have not already.
- Click Save. The Primary system is added to the list of Managers.
- Click Add. Or, if you have already added the Secondary Manager, click next to the Manager and choose Edit. Now, enter the IP address and Port of the Secondary Authentication Manager system. Leave the Primary setting at Off. Enter a valid License Key if you have not already.
- Click Save. The Secondary system is added to the list of Managers. To promote a Secondary Authentication Manager to Primary in case of a system failure or maintenance, see Promoting a Secondary Authentication Manager to Primary.
Installing the Access Authenticator IBM i Agent
Ensure the following servers are available and running prior to installation:
- FTP Server
- Remote Command Server
Do the following to perform the installation or update:
- Download the Access Authenticator installer (setupAccessAuthenticatorIBMi.exe) to your PC from the Access Authenticator download page.
- On the Choose Components panel, select which components you want to install. You can choose to install the Manuals and the Software for IBM i. Click Next.
- If you are installing the Manuals only, the process completes and the installer closes. The Manuals have been installed. You can skip the rest of these steps.NOTE: The manuals are installed to the following location:
C:\Program Files\PowerTech\Access Authenticator\manuals -
On the IBM i Details panel:
- Select or enter the IBM i system.
- Enter a user profile and password that is a member of the user class *SECOFR and has at least the following special authorities: *ALLOBJ, *SECADM, *JOBCTL, *IOSYSCFG, and *AUDIT. The user profile should have Limit capabilities set to *NO.
- (Optional) In the Advanced Settings section:
- Enter a port number or use the arrows if you want to change the FTP port number to something other than the default of 21.
- Select Secure File Transfer if you want to use FTPS (FTP over SSL) during the file transfer. The default FTPS secure port is 990, but it can be changed to the required secure port for your environment.
- In the Timeout (seconds) field, enter the number of seconds the session should be kept active during an FTP transfer. You can choose anywhere between 25 and 1800 seconds (30 minutes).NOTE: If the transfer takes longer than the amount of time specified, the session will expire.
-
Click Next.
-
You have two options on the Product Load Options panel:
-
Click Immediate Load if you’d like to load the product on the IBM i now.
-
Click Staged Load if you’d like to transfer the objects now and load them on the IBM i at a later time.
NOTE: See "Loading Staged Objects on the IBM i" (below) for instructions on how to load the staged objects on your selected IBM i system.
-
-
The Product Load Progress panel for Access Authenticator launches.
If the Product Load Progress panel ends with an overall Failed message, the product upload could not complete properly. To find the reason the upload failed, click View Logs and review your logs. You can also use Download at the top of the logs to save the information for future review.
When the processing is complete, you have two choices:
-
If this is the only installation or update of Access Authenticator that you're doing, click Finish.
-
If you have installs or updates to do on other IBM i systems, click Restart. Then, return to step 4.
-
Loading Staged Objects on the IBM i
If you chose to stage your objects during step 5b of the installation or update process, do the following to manually load them on the IBM i you identified above.
-
On the IBM i, execute the following command to display the Work with Loads panel:
HSLOADMGR/HSWRKLOAD
-
Enter option 1, Load, next to the Load Name for Access Authenticator and press Enter.
The installation program installs Access Authenticator, including the required user profiles and libraries (see table below for details).
The installation process displays the job log name, user, and job log number. Use the WRKSPLF command to display the job log for complete information on the Access Authenticator install.
Objects Installed on System
| Installed on System | Description |
|---|---|
|
Product Library |
PTMALIB |
|
User Profiles |
PMAADMIN, which has special authorities *ALLOBJ, *AUDIT, *IOSYSCFG, *JOBCTL, *SAVSYS, *SECADM, *SERVICE, and *SPLCTL
|
|
Authorization List |
PMAADMIN - Access Authenticator Administrators |
|
Subsystem |
PMASBS |
|
Job Queue Entries |
PTMALIB/PMAJOBQ added to PMASBS |
|
Objects in QGPL: |
Depending on the exit points that are being monitored, there could be up to four programs starting with PMA created in QGPL. |
|
Powertech-created Unregistered Exit Points: |
POWERLOCK_AA |
Configuring the IBM i Agent
After installation, you need to add any profiles that will require access to the IBM i agent's configuration settings to the PMAADMIN authorization list. Then, configure the IBM i agent to synchronize with Insite and the Authentication Manager.
- Sign on to the IBM i system and add the product administrator's user profile to the PMAADMIN authorization list:
WRKAUTL PMAADMIN
- Choose 2 to edit for the PMAADMIN authorization list.
- Press F6 and add the user profile. Object Authority should be set to *ALL.
- Repeat steps 1-3 for any other product administrators.
- Use the following command to open the Main Menu:
PTMALIB/WRKPTMA
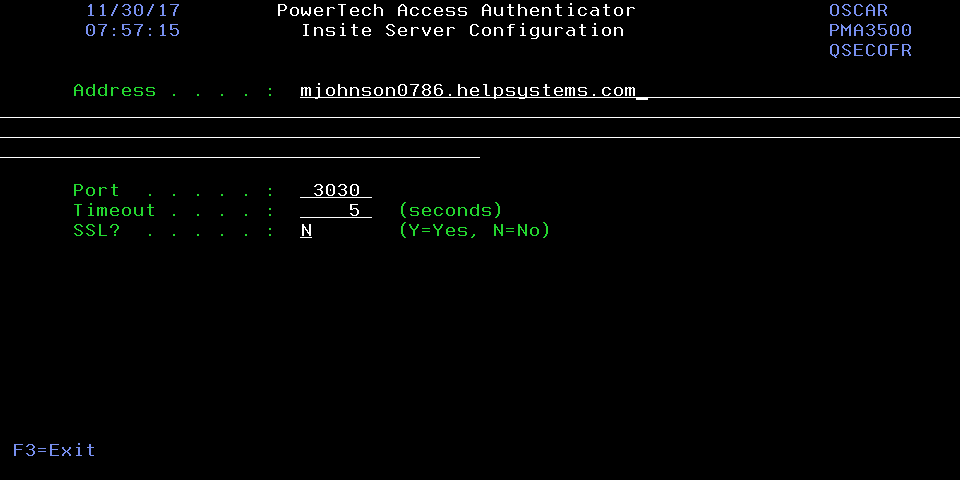
- Choose option 1 to open the Insite Server Configuration panel.
- Enter the IP address or DNS name (e.g. on Windows, the full computer name) and the port of the Insite server. The default port is 3030.

Press Enter to save changes.
- Press F3 to return to the Main Menu, then choose option 2. The Work with Authentication Managers panel appears. If you have already installed the Authentication Manager and Data Services, and added the Authentication Manager IP(s) to Insite, they appear here automatically.
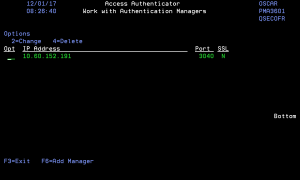 NOTE: If you have not yet installed/configured an Authentication Manager, you can press F6 to add it here manually before it has been installed/added to Insite. (You will need to know the IP and port it will be installed on.)
 - Press F3 to return to the Main Menu, then choose option 4. The Emergency Override Setup panel appears.
- Enter any profiles that will be allowed to bypass authentication in case of an emergency. Press Enter. The IBM i agent has been configured.NOTE: Choose option 3 to stop authentication on this IBM i system. See Deactivate Authentication Verification panel for details.
Next, you need to add the IBM i agent to Access Authenticator in Insite.
- Open HelpSystems Insite and choose Access Authenticator from the navigation pane on the left, then choose Agents.
- Ensure the IBM i system has been added as a product connection in Insite. See Product Connections in the Insite documentation.
- Click IBM i agent, then click Add. The Agents > New System screen appears.
- For System, choose Select System and choose the system you just configured.
- Configure any system settings and click Save. You return to the Agents > IBM i agent screen.
- To activate the system, click (on the right side of the screen) and choose Activate.

When the necessary components have been installed, see Administrator Setup Procedure to begin configuring and using Access Authenticator.
Starting and Stopping the IBM i Agent for Backups
When started, the Access Authenticator IBM i agent places a lock on ptmalib, which can interfere with system backup procedures. For this reason, and also in order to facilitate the addition of Access Authenticator into the startup program, the following commands are available:
- PMASTRMON - Start Access Authenticator
- PMAENDMON - Stop Access Authenticator
When backing up your system, use PMAENDMON to deactivate the agent and remove the object lock. After the backup is complete, use PMASTRMON to start the agent. If you are performing a backup with IPL, you can incorporate these commands into your backup procedure either manually or using scripts in a backup tool like Robot Save or BRMS.